ACRYLIC BOUCLE TOP by Roni Knutson
|
||||||||||||||||||||||||||||||||||||||||
|
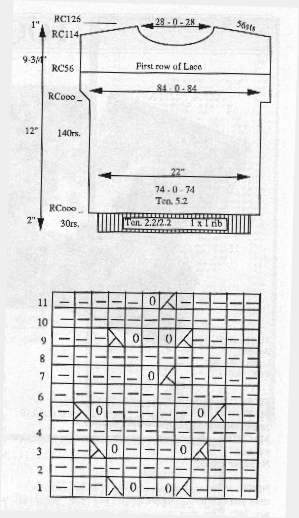
Back Cast on 74-0-74 sts. Do 30 rows in 1 x 1 rib at Tension 2.2. Transfer ribber stitches to main bed. RC000. Tension 5.2 Knit 140 rows in stocking stitch. Cap Sleeve - RC000. "e" wrap cast on 2 sts at beginning of next 2 rows. Cast on 1 st at beginning of next 4 rows. "e" wrap cast on 6 sts at beginning of next 2 rows.*** Knit to Row 108. CAR Shortrow the neckline - Push all needles to left of "0" and 20 sts to right of "0" to D position (holding position - Russell levers to I)
Repeat for second shoulder. Take neckline stitches off on waste yarn. Front Knit same as back to *** Knit to Row 56 - start lace of your choice here or see diagram. (29 rows available for lace - I handtooled my lace design even though I have a lace carriage as I'm too lazy to get it out for such a small amount of lace [not to mention that the lace carriage changes your gauge so you should do a swatch with the lace carriage too]. Carriage at Right.
Neckband Join one shoulder. Cast on 139 sts in 1 x 1 rib. Knit 15 rows as follows:-
Transfer ribber stitches to main bed. Push stitches behind latches. Hold garment up to machine - wrong side facing you. Hang neckline evenly on needles (in mouth of needles). To eliminate bulk, bring stitches behind latches over stitches in mouth of needles. Latch off. Join other shoulder. Sleeve Bands Hold sleeve edge to machine to get an idea of how many stitches to cast on. Cast on and rib 15 rows - attach to garment using same procedure as used on neckband. Complete other sleeve band to match. Sew side seams.
This pattern was first published in The Carriage Trade, Issue #31, June 1989 |
||||||||||||||||||||||||||||||||||||||||
|
