| |
| Machine |
Standard 4.5 gauge with ribber |
| Size |
Fits men's shoe size 8 to 11 approx. |
| Materials |
Two balls of Patons 3 ply Kroy in main colour. One ball of contrast (or oddments). |
| Gauge |
I haven't given you my sts and rows per 4 inches. I could but there is no point trying to match to it. When it
comes to tension your machine and my machine can be world's apart. (My last standard would happily knit 4 ply
acrylic on T6 but the machine I have now wants T7 for the same gauge.) Trying to match the tension on the ball
band is often not possible either. The best thing to do is to knit one sock using my tensions and then adjust as
necessary. You are probably groaning at that but you will need to do a sample for the circular part anyway, in
order to find out what tension on the ribber gives approximately the same tension on the main bed. If you prefer
you can knit a tension swatch only to check this rather than knit a sock that has a distinct line down the side.
But keep in mind that socks that turn out the correct size for me may not turn out the right size for you as colour
of yarn makes a difference too and I haven't even mentioned the complex problem of making them to fit different
feet. So chances are you will need to knit more than one sock to get a perfect fit. Still it will take hardly any
time at all by machine as compared to hand knitting them
And then there is the problem of Patons Kroy sock yarn. You have to read the ball band because even though it says
sock yarn it could be 28 sts and 36 rows to 4 inches so if you knit with that it would be too thick and would come
out the wrong size (ask me how I know ;(( not to mention it would be a hard push on Tension 6. If like me you occasionally
find sock yarn at the thrift store, check it carefully it could also be discontinued and if you run out then you
are on your own. Of course, you could do contrast heels and toes. Check ravelry.com
for information on these yarns. Oh. and Lady Galt Kroy 3 ply appears to be the same as Patons Kroy 3 ply.
Articles and patterns to read or download: http://machineknittingetc.com/singer-sock-book-seamed-and-circular.html
http://machineknittingetc.com/machine-knit-news-machine-knit-socks-suppliment.html
https://www.interweave.com/article/knitting/how-a-sock-is-supposed-to-fit/
(Check your ribber manual for instructions for circular or tubular knitting. (Every time you cast on 1x1 rib
you are doing circular. Those three rows after the initial zigzag row are circular rows.) |
| Punchcard |
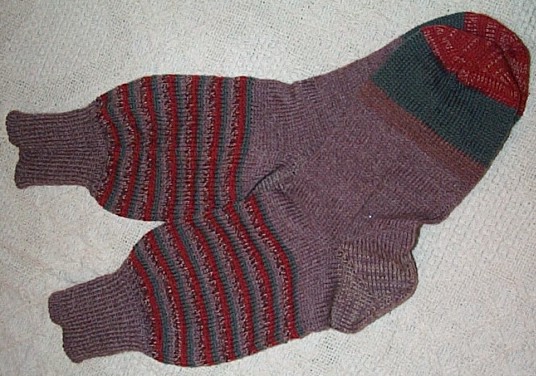
Photo above shows the socks done in stripes, normally I do them in fairisle. When doing fairisle, use small repeating
pattern for less floats (doesn't have to be too tiny - just check that the floats aren't too big. Do a sample first
as you may need to reverse your yarns when you start the design. (Since I have an electronic I use design #15-45
from the original card pack that comes with the machine and I reverse the yarns (contrast in feeder 1 and main
colour in feeder 2 when I start the design.) |
Rib - Cast on 74sts (37-0-37) in 1 x 1 rib with main colour (I sometimes do the cast on rows with
the contrast colour, which looks really nice, then switch to the main colour). Rib 37 rows at tension 3/3. Carriage
at right. Transfer ribber stitches to main bed. RC 000. (In some colours the cast on row was too stiff and I
had to use tension 0.2 or even 1 on both main bed and ribber, so adjust as necessary.)
Ankle - Set tension to 6, (margins to 36-0-36 and N1 to 36R, if you have an electronic).
If you have a punchcard machine, insert punchcard and lock on row 1 to memorize the design. Knit 2 rows in plain
stocking stitch. Unlock card, insert second colour, T7, selector to fairisle. Start fairisle design. I knit two
repeats of the pattern to row 54, you may have to adjust slightly to finish a repeat. (If you don't fancy fairisle
you can do them in plain stocking stitch and start the circular knitting after a couple of rows of stocking stitch.)
Take out contrast colour, remove or lock punchcard, selector to stocking stitch and T6, knit 12 rows plain (if
you find you have trouble at this point when picking up the stitches, try doing the last row 1 tension looser [T7]
). RC66.
Set up for circular knitting -Russell Levers to I (hold position), push half the sock needles
to D positon. Take half of sock off on waste yarn (note which half so that you can do the opposite half on the
next sock). Using the 3 prong tool, return the needles in D to the B position. Drop the ribber a notch and
fold the half of the sock on waste yarn so that it lies exactly opposite the needles in B on the main bed (right
sides facing, purl side out). (I usually use one of the tools to poke it so that the raw edge of the waste yarn
is tucked forward and down behind the ribber and the stitches I want to pick up are arranged in a nice visible
row.) Using a single transfer tool, pick up stitches from below the waste yarn and put them on the ribber facing
the other half of the sock. Take off the waste yarn (pull the end from beneath the knitting - between the beds)
and push the ribber up so that it is back in the proper ribbing position. Take a size 13 or 14 (very thin!) knitting
needle and carefully push it through the sock under the knitting machine and hang two small ribber weights on it
to keep it from rising up. (For those of you who have never knit socks before this is in lieu of your ribber
comb and weights).
Start circular knitting - RC 000. Russell Levers to II. Main bed T6, Ribber T7.2 (If you did
what I suggested and knit a swatch in circular stocking stitch then you may need a different ribber tension at
this point.) Do four rows in circular stocking stitch (that's 8 rows on your row counter).
Heel shaping - Remove ribber arm, drop ribber one notch and attach main bed arm. Set main bed
carriage to holding position (Russell Levers to I) and stocking stitch. (At this point I add extra reinforcing
in the shape of a strand of nylon just to make sure the heel doesn't wear out too soon. If you haven't any you
can substitute woolly nylon serger thread or anything similar or do without.) Short row down to 13 and up again.
(In other words, Short Row Down:- pull 1 needle next to the carriage to D position, knit 1 row. Repeat
until there are 15 stitches in B position. Short Row Up:- push 1 needle opposite the carriage to C position
and knit 1 row. Continue until all the needles are in working position again.)
Foot - Set machine again for circular. Take out reinforcing nylon thread (unless you are knitting
for someone who wears out the bottom of their socks, then leave it in). RC 000. Knit 128 rows on row counter.
Toe - RC000. With 3 prong transfer tool decrease one stitch at both ends of the main bed and at
both ends of the ribber (4 stitches in all). Put in reinforcing yarn. Knit 4 rows on the row counter. Repeat until
17 sts remain. Take off on waste yarn.
Finishing - Graft toe stitches together or join in whatever way you feel comfortable with. Mattress
stitch the side seams taking care to match the pattern. If you have little holes at the heel, fill in a little
with matching yarn.
| Copyright©rvk July 14,1999 - revised somewhat Oct 12,/20 |
Home
|
|
|